Tutorial: Custom Toy Tutorial By Patrick Francisco
Oct 10, 2008 Author: Raphael | Filed under: Custom Toy Tutorials, Kidrobot 3" Dunny, Patrick Francisco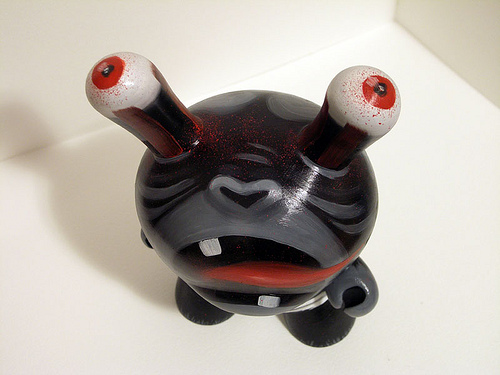
We had the chance to interview Patrick Francisco last month, cheapest this time however he shares with us his creative process from start to finish in creating his own custom Dunny. Enjoy readers!
Please note: Pictures are provided on the bottom of each description.
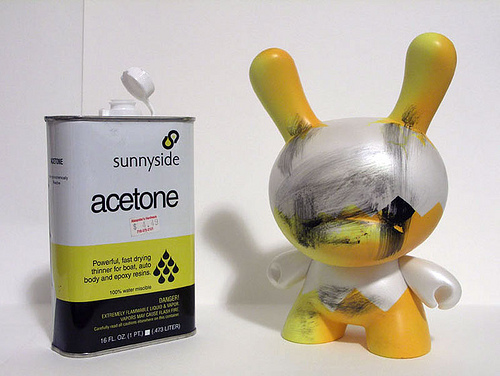
1. STRIP: Here is an Eggy Dunny about to get its existence wiped out. I take a paper towel dipped in acetone and rub away the current paint job. I hear Goof-Off works too, geriatrician but when I saw that the acetone packaging matched Eggy, ampoule I knew it was meant to be.
2. SAND: Now in his birthday suit, Eggy is a brand spanking eight inches of vinyl. I recently painted alongside Lou Pimentel and he stressed the importance of sanding. Lou says:
“Vinyl toys have traces of demolding grease that is applied to help remove the figures from the molds. Sand the toy with a fine grit sand paper. I use 320 grit. Wash the toy with warm water to remove the particles from the sanding.”
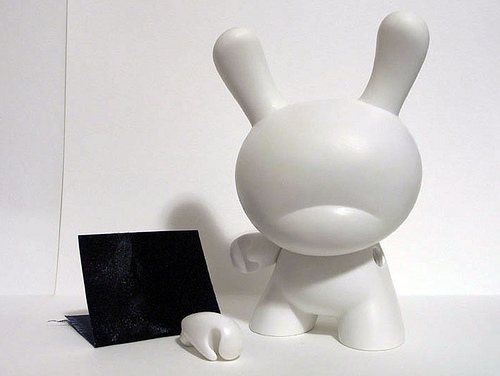
And so I waxed off like Daniel-san on a filthy car.
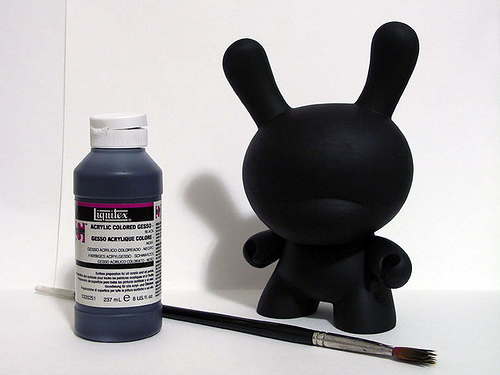
3. PRIME: Realizing that I’m probably still zooted from the acetone, I resist my sudden urge to write Paul Budnitz pleading for the sale of blank dunnies. Instead, I prime the dunny at hand with Liquitex gesso, which has a nice consistency. It covers well and is fluid without having to add water. One coat provides good coverage but I add a second for good measure. I use a synthetic brush for this because a bristle one would be too rough and a sable one would be too much of an investment to have acrylic or gesso dry on. I use black gesso to save time since my character is mostly black anyway.
4. SKETCH: I draw directly on the dunny with a colored pencil – the one used here is a Prismacolor Warm Grey. Even though this erases easily when necessary, I don’t worry about having a finished drawing at this point. I want to establish the drawing further as I paint so just a general placement of shapes in the sketch is ideal.
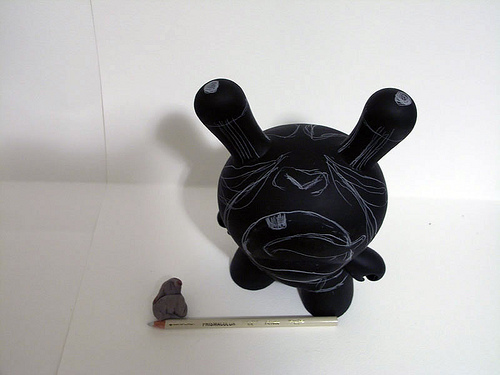
5. ACRYLIC: As a timesaver, I use acrylic for my first layer of paint. I continue to sketch with the acrylic and add water to keep the surface flat. I don’t mind brush-marks in the end product, but I prefer to do that with the oil paint. I continue to refine the drawing, but don’t go crazy with it since it will be covered in oil soon. I actually spill over the borders defined by the pencil drawing to set up the overlapping that will take place in these areas.
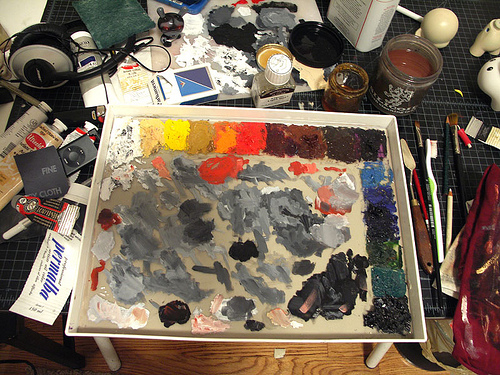
6. OIL: I tend to start with the least important parts or the parts I know I can finish quickly. I almost never paint the face first – I procrastinate everything. I painted the grey areas of the arms and legs a little high in the acrylic stage so I can come down with the oil and draw the hairs as I go along. As much as possible I want to run the paint together rather than paint up to an edge and stop. Where the chest and stomach meet the hair on the sides is a good example. I also repaint the black areas in oil – this time with thicker amounts of paint to leave brush marks. Those large areas deserve some sort of attention too (hard to see in these pics).
I start the head by painting black in the areas that I know will make contact with greys. This way, when I define the grey features, I am not left with a hard edged line separating the shapes. If I do end up with a hard line, I brush over it with and empty brush slightly soaked in Liquin Light. I end up doing a lot of back and forth until I find the edge and border definition I want. The same with the rest – a lot of pushing and pulling starting with darks and building up to middle and light tones. Last, I take a toothbrush loaded with red paint and flick splatter where I think they are needed.
I usually plan which area of the toy to leave unpainted so I can hold on to it while working on everything else. In this case, it is the lower back and bottom of the head. This ‘handle’ gets painted when everything else is done and I can work on it as the toy stands on its own. I actually end up smudging some of the paint when I reattached the head so I had to repaint the damaged areas. If you have more patience than I do, waiting for the paint to dry so the toy can be handled is probably a better idea.
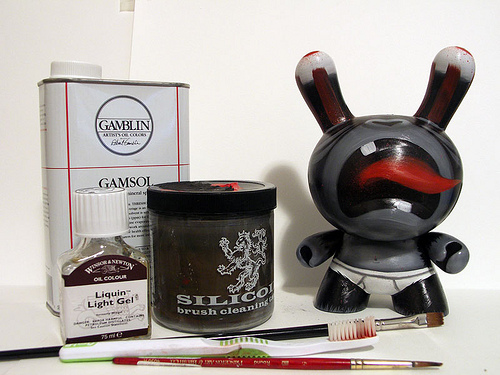
7. OIL SUPPLIES: For the most part, I used a round watercolor brush. The short handle of a watercolor brush makes toy painting easier and the round shape is great for varying stroke weights. For larger areas I used a bright sable. I like Liquin Light as a medium and I love that it quickly (about two hours) makes oil paint tacky enough to easily pile more paint on. When I finish a toy and the paint is completely dry, I add a layer of Liquin Light to revive the painting.
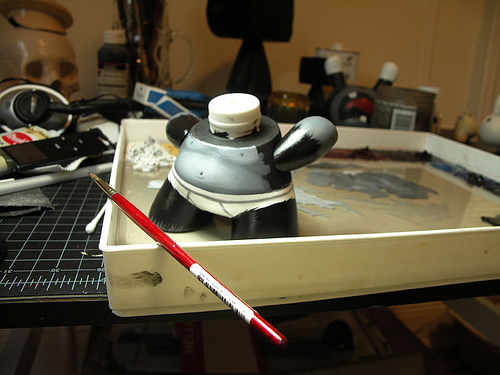
8. RESULT: The most important part, the result!

Categories
- Artists (580)
- 12punt3 (2)
- 64 Colors (2)
- aargh (1)
- Aaron "Aaalke" Keeling (1)
- Aaron Boy (2)
- AKA MAG (2)
- AKO – Akayo (1)
- Albert Art (1)
- Alex (aka Lizard J) (1)
- Amy Jenkins (1)
- Angelica (4)
- Anna Hamilton (3)
- Anna Härlin (1)
- Aparatchik (3)
- APW@HY (1)
- AtK (1)
- Attila (6)
- Augiewan (2)
- BELL (4)
- Ben The Illustrator (3)
- Bil BetsOvic (16)
- Biscuitboy (1)
- BleedingEdges (1)
- Bob Conge – Plaseebo (7)
- Bob Horner (1)
- Bovinyl (1)
- Brent Nolasco (1)
- Brian Castleforte (5)
- Brian Colin (2)
- Brigid Ashwood (1)
- Bruce Richardson (2)
- Bryan Collins (3)
- Bytedust (3)
- Catherine J. Cruz (Kositanont) (1)
- Charles Rodriguez (2)
- Charlie Alan Kraft (1)
- Charuca (1)
- Cherise R. Ward (1)
- Chris Athans (1)
- ciah-ciah (3)
- Cidenzo (2)
- Clint Anscombe (1)
- Cloudsfactory (1)
- Cocoakoala (2)
- Collin David (1)
- Coreroc (5)
- Cragmire (6)
- Creepy (aka J. Yonkman) (1)
- Cynjon Noah (1)
- D Emory Allen (2)
- D-LuX (1)
- Dan May (1)
- danii (1)
- Danny Roldan (4)
- Darryl Kluskowski (1)
- das mo (2)
- Davidrios Ferreira (2)
- Dawid R. Kwiatkowski (1)
- Derek Kiser (1)
- DJA aka Left-I (12)
- Django / TheRealDjango (1)
- DLi$h (2)
- Doktor A (7)
- Doug Land. (1)
- Dr. Bao / NVC Crew (1)
- DragonCypher (1)
- Dril One (3)
- Dust (1)
- Eloole (2)
- EmaStudio (1)
- enigmainsoluto (2)
- Ennio Milani (1)
- Era (1)
- Erwin Weber (7)
- Esro (1)
- Eyebone (5)
- Fabio Rossi (1)
- Fabiola Baires (3)
- Federico Gonzalez (2)
- Federico Mancosu (1)
- Felix Jackson (1)
- fershozombie (1)
- Fervid Unicorn (1)
- Fi the Imaginator (1)
- Flod (1)
- Florence McLean (2)
- Fluffels (1)
- Freck (1)
- Frenchie (2)
- Gawein (5)
- Gigglesauce (2)
- Gods & Monsters (1)
- GoNi (1)
- Grimsheep (2)
- Hans Yim (2)
- Hellopike (2)
- Hugh Rose (1)
- Idle (5)
- Ingeborg Hairwassers (1)
- Irfan Hendrian (1)
- Israel Chavira (8)
- ivy (1)
- James "Jimbot" Demski (2)
- James – Style43 (1)
- James yeah (4)
- Jared Gagne (2)
- Jason Kochis (7)
- JennyFur Deveraux (3)
- Jeremiah Ketner (1)
- Jesse Hernandez (1)
- Jim Koch (4)
- JMS – Jovy (4)
- João Silva (1)
- Joe Grady – RebelWookiee (2)
- Joe Grady a.k.a. RebelWookiee (2)
- Jon Daulby (1)
- Jonathan Minori (1)
- JonDoesDoodles (2)
- jonpaulkaiser (4)
- Jorge Koke Petit (1)
- Josh (f+) Pearce (3)
- Josh Divine (1)
- JP Artwork (2)
- K.I.A. (1)
- KaNO (1)
- Karitas Palsdottir (1)
- kas (1)
- Kat Brunnegraff (3)
- Keeley Carrigan – BlooEmpire (1)
- Kenn Munk (7)
- Kerry Lee (1)
- Kevin Gosselin (2)
- Kill Taupe (1)
- Konako (1)
- KT (1)
- Kye Pirrie (1)
- La Merguez Masquée (1)
- Laska Comix (1)
- Lawrence Northey (1)
- Leecifer (1)
- Leftygohome aka. SMS (1)
- LEX (8)
- Lizard J (1)
- Lou Pimentel (2)
- Lydia Dekker (1)
- M.A.R.T.A (2)
- Mad Pierrot (2)
- Makkinoso (1)
- MANIMAL (1)
- Maria Antunes (1)
- Maria Cristina Martino (1)
- Marie Winger-Meyer (1)
- Marisa Straccia (1)
- Maritza of Soto Softies (1)
- Mark Meyers (2)
- Matthew Weekley (2)
- Mauerlat (2)
- Mauricio Murillo (1)
- Maxrock (1)
- Mazzalicious (3)
- Meffi (1)
- melodreama (1)
- Meni Tzima (1)
- Mheisler (2)
- Midas (1)
- Mike Slobot (3)
- Miscreation – Jeremi Rimel (11)
- Miskellaneous (3)
- Miss Peal (3)
- Moggis (1)
- Monkej (2)
- Monster Decay (1)
- Mr Jones (1)
- Mr. Do It Right (2)
- Muju (1)
- Munkyman (1)
- N.C. Winters (3)
- Nanan1 (2)
- Nevermore (1)
- NIARK1 (1)
- Nicholas McPherson (1)
- Nix Toxic (2)
- Noosed Kitty (Jamie Fales) (1)
- NREAZON (1)
- Nugglife (1)
- omnicollective (1)
- Optikmass (3)
- OsirisOrion (4)
- Patrick Francisco (7)
- Paulie (1)
- Phu! (5)
- PleaseFlush (2)
- Plushism – Nico Teo (3)
- Pocketwookie (1)
- POLYESTER (1)
- pottstarr (M. G. Litan) (2)
- Ready2Rumbl (2)
- Ricardo Porven (1)
- Riccardo Bucchioni (2)
- Richard Page (1)
- Rikky Carrion (1)
- Rino Valente (1)
- Riot68 (14)
- Robert Anaya Jr. (2)
- Robson Lelis (1)
- Robyn Fabsits (2)
- Rotobox Vinyl Anatomica (4)
- Rustedhalo (1)
- Ryan Crippen – Reactor88 (10)
- S4ndm4n – Matthew Beers (1)
- Santiago Robles (1)
- Sarah Miskelly (1)
- Sarah S (1)
- Saturn Sixx (1)
- SCAVE (4)
- Scribble (1)
- Selph (4)
- Sheryo (2)
- Shuijingfantasy (2)
- Simon Mitchell (1)
- Simon Wong (1)
- Simplequirk (1)
- siXsiXsiX – Mike Friedrich (2)
- Sjors Trimbach (3)
- SNUB (1)
- Somanyprojects (1)
- Spooky Daddy (3)
- Squidboy- Shan Michael Evans (11)
- Squink (5)
- SteamCrow (1)
- Stephanie (1)
- Steve Talkowski (3)
- Steve Tenebrini – Cerdo (1)
- SukiSuki (3)
- Supersentido (1)
- Surya and Sigit (1)
- Swanski (1)
- Tamie Snow (1)
- Tan-ki (1)
- Tat Amie (1)
- TazX (1)
- Ted Stilson (4)
- The Burger Lord – Scott (1)
- The Killer Gerbil (2)
- ThePete (1)
- the_lover (3)
- thisisrabbit (1)
- Tibor Simon (1)
- Tony (1)
- Toysrevil (1)
- Trenton M (3)
- Troy Stith (3)
- Twit©H (1)
- VANG (1)
- veer (1)
- Vi @ Graphicairlines (1)
- Victor Huang (1)
- Victor Huang (2)
- Vito (1)
- Walter Jacott aka. Chauskoskis (1)
- Wavedog (9)
- Woser (1)
- Yiao (2)
- Zebulon (1)
- Competitions (6)
- Custom Toy Tutorials (5)
- Events & Exhibitions (SEEN) (11)
- Events & Exhibitions (UPCOMING) (17)
- Call For Artists (3)
- Events And Shows (10)
- America (10)
- Hand Made Plush (59)
- Large Plush Toys (42)
- Mini Plush Toys (12)
- Interviews (2)
- Large Vinyl Toys (336)
- 10" Gosho (1)
- 10" Icebots (1)
- 10" Knuckle bear (1)
- 10" Trexi (4)
- 10†Teddy Troop (5)
- 12" FLCL Canti (1)
- 18" Knuckle Bear (1)
- 19" Zlik (1)
- 6" Skumbo (1)
- 7" Smash (1)
- 8" Moody (10)
- All City Style Subway Car (1)
- Buzz Carney (3)
- Circus Punks (3)
- Dalek (1)
- Doze Green Travela (1)
- Dr. Bomb (2)
- Floaty Bear (1)
- Fourcube (1)
- Grabbit (1)
- Hellhound (1)
- JAMUNGO 9" B.U.D. (7)
- JAMUNGO 9" NADE (7)
- JAMUNGO SQWERT (1)
- Kidrobot 10" Labbits (2)
- Kidrobot 5" Labbits (3)
- Kidrobot 6" Teeter (1)
- Kidrobot 7" Munny (4)
- Kidrobot 8" Dunny (23)
- Kidrobot 8" Munny (109)
- Kidrobot Mega Munny (4)
- Kidrobot Munny Mobile (1)
- Large Rubby Ducky (1)
- Lunartik in a cup of tea (1)
- Mad*L (14)
- Mega Meatwad (1)
- MegaGwin 13" (1)
- NedZed (1)
- NedZed (1)
- Ningyo Gosho (1)
- Pink Veil by Jermaine Rogers (1)
- Plaseebo (1)
- Rolito (1)
- Sam Flores' Fatima (1)
- SwearBear (1)
- Toy2r 16" Qee (3)
- Toy2r 8" Qcat (1)
- Toy2r 8" Qee (40)
- Toy2r Rolitoboy (1)
- UNKL SUG (1)
- Mini Vinyl Toys (135)
- 3" Baby Di Di & Mei Mei (1)
- 3" Mad*L (3)
- 3" Trexi (2)
- 3" Whalenas (1)
- 3.5" Teddy Troop (1)
- 4" Icebot (1)
- Artoyz Chaos Monkey (1)
- Bagman (1)
- Broken Heart Robot (1)
- Get Small Jeremy Fish (1)
- Kaniza – StarFish (1)
- Kidrobot 2" Labbits (4)
- Kidrobot 3" Dunny (40)
- Kidrobot 3" Fatcap (1)
- Kidrobot 4" Bub (1)
- Kidrobot 4" Mini Munny (57)
- Munnyworld 4" Mini Trikky (1)
- Scarygirl City Folk (1)
- Snorse by Pete Fowler (1)
- Tamo (6)
- Toby HK (1)
- Toy2r Baby Qee (3)
- U.B.Funkey (1)
- Vimobot (4)
- Shop (2)
- Site News/Annoucements (4)
- Various Toys (34)
- Cars (3)
- Paper Toys (13)
- Plaster Toys (3)
- Wood Toys (4)
- Videos (1)
Archives
- March 2016
- December 2014
- August 2012
- July 2012
- April 2012
- September 2010
- August 2010
- July 2010
- June 2010
- May 2010
- April 2010
- March 2010
- February 2010
- January 2010
- December 2009
- October 2009
- September 2009
- August 2009
- July 2009
- June 2009
- May 2009
- April 2009
- March 2009
- February 2009
- January 2009
- December 2008
- November 2008
- October 2008
- September 2008
- August 2008
- July 2008
- June 2008
- May 2008
- April 2008
- March 2008
- February 2008
- January 2008
- December 2007
- November 2007
- October 2007
- September 2007
- August 2007
- June 2007
- May 2007
- April 2007
- March 2007
- February 2007
Meta
Art
Designer Vinyl Toys
- Crazy Toyz
- Custom Toy World
- Dunny Club
- Kitoy
- Mine Has Blue Wings
- Miscreation Toys
- Omni Monster
- Plastic And Plush
- Toy Break
- Toysrevil
- Vince Toys Studio
- Vinyl Abuse
- Vinyl Addiction
- Vinyl Pulse
- Vinyl Toys Forum
- Wondertoyz
Paper Toys
Plush Toys
Twitter (follow us!)
