Tutorial: Custom Droplet Tutorial by James Yeah?
Dec 17, 2008 Author: Raphael | Filed under: Custom Toy Tutorials, James yeahBack in August 2008 we interviewed James yeah? here on Custom Toy Lab. This time he’s back with his very own custom Droplet tutorial showing you how he gets his work done from start to finish. Thanks again James!

The Story: Bear lost his legs in a terrible accident when he was working in the forest as a tree logger, unfortunately once he lost his legs the rest of the bear tree logging population excluded him from the group, alone and sad bear left and went to live by the sea on his own. After a while he befriended a little sea lion but bear being a bear couldn’t stop his natural urges and he ate the poor friendly sea lion. Upon eating him bear realised he’d made a huge mistake as he was alone again, so he struck on an idea! He dressed himself up in sea lions fur suit and pretended to be a sea lion. Now bear lives a happy life frolicking around in the sea with his new found sea lion friends and he resists the urge to eat them all by living off a diet of freshly caught fish.
Please note: All pictures are provided on the bottom of each description. There are many pictures included in this tutorial to assist you with every step. Allow some time for the images to fully load.
1) Make yourself a cup of tea (coffee if you must) you should repeat this about every 2-3 stages, tea is highly important in the toy making process I find.

2) Choose your toy, I’ve chosen a droplet by jamfactory and crazy label (You can get them direct from jamfactory or any good toy shop) Once you’ve chosen your toy, try and draw out a rough idea for it as this will help you with the making process and give you something to reference whilst making it. Things will change from your original design so don’t worry, the colours I’ve used won’t be the final colours and some details may be changed a long the way, as what you’ve drawn in 2d might not look right when you transfer it to a 3dimensional toy. I’ve decided to make a bear type thing (I will tell you his story later, giving your toy a story is a nice little touch)

3) Use some quite rough wet and dry paper (you can use fine sandpaper as well) to roughen it up and take any bits of the design off that may be sticking up off the toy, this also helps your clay/putty and paint to stick better later on.

4) Get your clay/putty/sculpey ready and all your modelling tools ready. I use milliput which is a 2 part air drying epoxy putty, I prefer using this over sculpey as I don’t need to risk putting my toy in the oven and watching it melt. The only problem is it takes a good 6-12 hours to properly dry hard. I also have a little pot of water ready as with milliput you can pretty much get it super smooth with just a bit of water on your tool, this saves on sanding later and gives a really nice smooth finish to your sculpting.
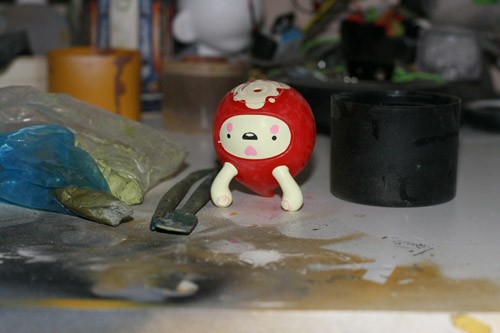
5) It’s time to add your clay/putty, I’ve made the cheeks in 2 separate parts then joined them up, then I’ve put the nose on top to hide the join, I find it easier to make things in small parts than to try and sculpt out of one big piece. I’ve also filled the hole in on top of the head to start making it round as it’s currently flat, although I’ve only used a little bit of clay, I need that to dry first before I add more otherwise I’ll end up just pushing clay into the toy. Now I’ll leave all that to dry over night so it sets completely solid.

6) As always I’d forgotten to do something, so now I’ve added the base for the ears, If I was to make the ears full size straight away I’d risk them not sticking properly and it’d be more work to get them the shape I wanted, this way I can leave these to dry and then add onto them later much more easily.
7) I’ve added on the paws, added more clay to the top to help round out the flat part on its head, I’ve also added more to the ears to make them bigger and more ear like. I’ve also just added the base of my favourite part, the nipples! Everything should have nipples as nipples are marvellous little things. Now to wait over night whilst all that hardens again.

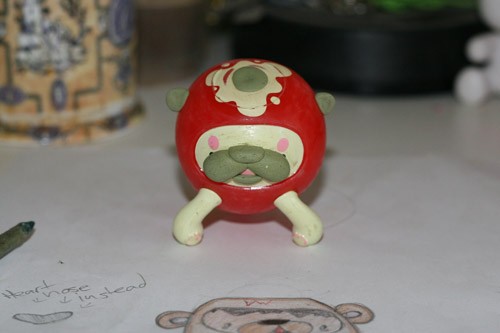
8) Just so you can see I’ve added a little paw to the back of the leg as well, you should always try and think how your toy will look from all angles as it may not always be displayed head on. This photo also gives you an idea of the shape of the face and how much I’ve made it stick out as well as the head getting rounder.

9) I’ve added an extra little tail thing onto the back, it helps balance the shape out and make it more symmetrical, it is also part of the story related to this toy. It was going to be a furry tail but I tried that and decided this looked better (see what I mean about not always following your original drawing exactly) You also can’t see in the photo but I added the final bits of the nipples on. Let it harden overnight again.

10) Time to get the fine wet and dry paper or very fine sandpaper out again, go over everything and try and get it as smooth as you possibly can, the more time you spend on this part the better the final piece will be. I spend an awful lot of time sanding and I’m sure I’m getting tennis elbow but I feel it’s completely worth it.
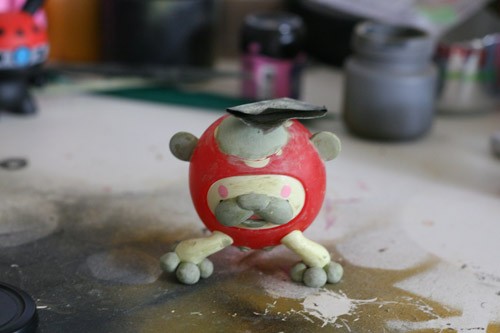
11) So after sanding it all down I found a few flaws, mainly where I’d filled the flat part of the head in and on the ears, so, it’s time to get the milliput out again, fill in all the flaws and try and get that as round as possible and fill in any little grooves or mistakes you’ve found after sanding. Let it harden overnight again.

12) Sand down the latest millput editions, I’m trying to make the top as close to looking like its part of the toy as possible; this is quite time consuming but will be worth it later on.

13) It’s time to prime your toy, you should always prime after you’ve done some additional sculpting or modifying. I use a white car primer as it’s cheaper than graffiti primer and I find it gives a much smoother finish and it also fills in some very minor marks to give a completely smooth finish.

14) Now the toy is primed it’s time to decide on the final colours and to start mixing them up. I use citadel (games workshop) acrylics as they’re designed for painting small toys and tend to be quite thin and easy to use but you can thin down any acrylics really. I’ve mixed up a couple of browns with some white to create a lightish brown I think is suitable for the bear.

15) Time to start painting and this is where everything can and usually does go wrong for me. I always use a very wet soft brush and do an awful lot of very thin paint layers, this is very time consuming but it means you don’t leave brush strokes all over your toy and gives it a much nicer almost production quality finish. Try and do all the brush strokes in the same direction as this also helps reduce brush marks. Don’t worry about being neat at this stage as these are just base coats.

16) Add more layers until it starts to darken up and you can’t see many different colour patches, I’ve also started to paint the legs the same colour as the body, and I was going to paint them slightly darker but decided to keep them body coloured. I’ve just painted over the nipples and everything as it means I can keep the brush stroke going and they’ll be painted over later anyways.

17) Paint the final layer very carefully with a very wet brush and thinned down paint, the brown is now done and as you can see there’s no lighter patches and the finish is pretty smooth and free from big brush marks.

18) I’ve done the same method as explained in steps 15, 16 and 17 to paint the pink face, paws and nipples. I’ve also added a couple of little dots of pink to the ears just so they’re not completely brown.

19) It’s time to start on the more detailed painting. I have painted a very light pink ring around the inside just to separate the pink face from the brown fur and I’ve also painted the white base for the eyes on, both done with a wet brush and thinned down paint again like in the previous steps.

20) I’ve now mixed up a darker pink to paint the nose and inside of the mouth to give some definition to the face, again always with a wet brush, thinned down paint and a few layers to reduce brush marks.

21) This is the final part; I’ve painted a very fine dark pink line around the white of the eyes, a darker pink centre and then finally a very small white dot in the centre to give the eyes some life. I also added some very fine white lines over the eyes for eyebrows to give him a bit of an expression.

22) I’ve decided to add a few white dots to the pink cheeks to imitate little whiskers and I’ve taken a photo with a white background so you can see the final toy better as it’s less distracting and shows the toy off better. That’s the toy finished and ready to go off to his new home :)
Categories
- Artists (580)
- 12punt3 (2)
- 64 Colors (2)
- aargh (1)
- Aaron "Aaalke" Keeling (1)
- Aaron Boy (2)
- AKA MAG (2)
- AKO – Akayo (1)
- Albert Art (1)
- Alex (aka Lizard J) (1)
- Amy Jenkins (1)
- Angelica (4)
- Anna Hamilton (3)
- Anna Härlin (1)
- Aparatchik (3)
- APW@HY (1)
- AtK (1)
- Attila (6)
- Augiewan (2)
- BELL (4)
- Ben The Illustrator (3)
- Bil BetsOvic (16)
- Biscuitboy (1)
- BleedingEdges (1)
- Bob Conge – Plaseebo (7)
- Bob Horner (1)
- Bovinyl (1)
- Brent Nolasco (1)
- Brian Castleforte (5)
- Brian Colin (2)
- Brigid Ashwood (1)
- Bruce Richardson (2)
- Bryan Collins (3)
- Bytedust (3)
- Catherine J. Cruz (Kositanont) (1)
- Charles Rodriguez (2)
- Charlie Alan Kraft (1)
- Charuca (1)
- Cherise R. Ward (1)
- Chris Athans (1)
- ciah-ciah (3)
- Cidenzo (2)
- Clint Anscombe (1)
- Cloudsfactory (1)
- Cocoakoala (2)
- Collin David (1)
- Coreroc (5)
- Cragmire (6)
- Creepy (aka J. Yonkman) (1)
- Cynjon Noah (1)
- D Emory Allen (2)
- D-LuX (1)
- Dan May (1)
- danii (1)
- Danny Roldan (4)
- Darryl Kluskowski (1)
- das mo (2)
- Davidrios Ferreira (2)
- Dawid R. Kwiatkowski (1)
- Derek Kiser (1)
- DJA aka Left-I (12)
- Django / TheRealDjango (1)
- DLi$h (2)
- Doktor A (7)
- Doug Land. (1)
- Dr. Bao / NVC Crew (1)
- DragonCypher (1)
- Dril One (3)
- Dust (1)
- Eloole (2)
- EmaStudio (1)
- enigmainsoluto (2)
- Ennio Milani (1)
- Era (1)
- Erwin Weber (7)
- Esro (1)
- Eyebone (5)
- Fabio Rossi (1)
- Fabiola Baires (3)
- Federico Gonzalez (2)
- Federico Mancosu (1)
- Felix Jackson (1)
- fershozombie (1)
- Fervid Unicorn (1)
- Fi the Imaginator (1)
- Flod (1)
- Florence McLean (2)
- Fluffels (1)
- Freck (1)
- Frenchie (2)
- Gawein (5)
- Gigglesauce (2)
- Gods & Monsters (1)
- GoNi (1)
- Grimsheep (2)
- Hans Yim (2)
- Hellopike (2)
- Hugh Rose (1)
- Idle (5)
- Ingeborg Hairwassers (1)
- Irfan Hendrian (1)
- Israel Chavira (8)
- ivy (1)
- James "Jimbot" Demski (2)
- James – Style43 (1)
- James yeah (4)
- Jared Gagne (2)
- Jason Kochis (7)
- JennyFur Deveraux (3)
- Jeremiah Ketner (1)
- Jesse Hernandez (1)
- Jim Koch (4)
- JMS – Jovy (4)
- João Silva (1)
- Joe Grady – RebelWookiee (2)
- Joe Grady a.k.a. RebelWookiee (2)
- Jon Daulby (1)
- Jonathan Minori (1)
- JonDoesDoodles (2)
- jonpaulkaiser (4)
- Jorge Koke Petit (1)
- Josh (f+) Pearce (3)
- Josh Divine (1)
- JP Artwork (2)
- K.I.A. (1)
- KaNO (1)
- Karitas Palsdottir (1)
- kas (1)
- Kat Brunnegraff (3)
- Keeley Carrigan – BlooEmpire (1)
- Kenn Munk (7)
- Kerry Lee (1)
- Kevin Gosselin (2)
- Kill Taupe (1)
- Konako (1)
- KT (1)
- Kye Pirrie (1)
- La Merguez Masquée (1)
- Laska Comix (1)
- Lawrence Northey (1)
- Leecifer (1)
- Leftygohome aka. SMS (1)
- LEX (8)
- Lizard J (1)
- Lou Pimentel (2)
- Lydia Dekker (1)
- M.A.R.T.A (2)
- Mad Pierrot (2)
- Makkinoso (1)
- MANIMAL (1)
- Maria Antunes (1)
- Maria Cristina Martino (1)
- Marie Winger-Meyer (1)
- Marisa Straccia (1)
- Maritza of Soto Softies (1)
- Mark Meyers (2)
- Matthew Weekley (2)
- Mauerlat (2)
- Mauricio Murillo (1)
- Maxrock (1)
- Mazzalicious (3)
- Meffi (1)
- melodreama (1)
- Meni Tzima (1)
- Mheisler (2)
- Midas (1)
- Mike Slobot (3)
- Miscreation – Jeremi Rimel (11)
- Miskellaneous (3)
- Miss Peal (3)
- Moggis (1)
- Monkej (2)
- Monster Decay (1)
- Mr Jones (1)
- Mr. Do It Right (2)
- Muju (1)
- Munkyman (1)
- N.C. Winters (3)
- Nanan1 (2)
- Nevermore (1)
- NIARK1 (1)
- Nicholas McPherson (1)
- Nix Toxic (2)
- Noosed Kitty (Jamie Fales) (1)
- NREAZON (1)
- Nugglife (1)
- omnicollective (1)
- Optikmass (3)
- OsirisOrion (4)
- Patrick Francisco (7)
- Paulie (1)
- Phu! (5)
- PleaseFlush (2)
- Plushism – Nico Teo (3)
- Pocketwookie (1)
- POLYESTER (1)
- pottstarr (M. G. Litan) (2)
- Ready2Rumbl (2)
- Ricardo Porven (1)
- Riccardo Bucchioni (2)
- Richard Page (1)
- Rikky Carrion (1)
- Rino Valente (1)
- Riot68 (14)
- Robert Anaya Jr. (2)
- Robson Lelis (1)
- Robyn Fabsits (2)
- Rotobox Vinyl Anatomica (4)
- Rustedhalo (1)
- Ryan Crippen – Reactor88 (10)
- S4ndm4n – Matthew Beers (1)
- Santiago Robles (1)
- Sarah Miskelly (1)
- Sarah S (1)
- Saturn Sixx (1)
- SCAVE (4)
- Scribble (1)
- Selph (4)
- Sheryo (2)
- Shuijingfantasy (2)
- Simon Mitchell (1)
- Simon Wong (1)
- Simplequirk (1)
- siXsiXsiX – Mike Friedrich (2)
- Sjors Trimbach (3)
- SNUB (1)
- Somanyprojects (1)
- Spooky Daddy (3)
- Squidboy- Shan Michael Evans (11)
- Squink (5)
- SteamCrow (1)
- Stephanie (1)
- Steve Talkowski (3)
- Steve Tenebrini – Cerdo (1)
- SukiSuki (3)
- Supersentido (1)
- Surya and Sigit (1)
- Swanski (1)
- Tamie Snow (1)
- Tan-ki (1)
- Tat Amie (1)
- TazX (1)
- Ted Stilson (4)
- The Burger Lord – Scott (1)
- The Killer Gerbil (2)
- ThePete (1)
- the_lover (3)
- thisisrabbit (1)
- Tibor Simon (1)
- Tony (1)
- Toysrevil (1)
- Trenton M (3)
- Troy Stith (3)
- Twit©H (1)
- VANG (1)
- veer (1)
- Vi @ Graphicairlines (1)
- Victor Huang (1)
- Victor Huang (2)
- Vito (1)
- Walter Jacott aka. Chauskoskis (1)
- Wavedog (9)
- Woser (1)
- Yiao (2)
- Zebulon (1)
- Competitions (6)
- Custom Toy Tutorials (5)
- Events & Exhibitions (SEEN) (11)
- Events & Exhibitions (UPCOMING) (17)
- Call For Artists (3)
- Events And Shows (10)
- America (10)
- Hand Made Plush (59)
- Large Plush Toys (42)
- Mini Plush Toys (12)
- Interviews (2)
- Large Vinyl Toys (336)
- 10" Gosho (1)
- 10" Icebots (1)
- 10" Knuckle bear (1)
- 10" Trexi (4)
- 10†Teddy Troop (5)
- 12" FLCL Canti (1)
- 18" Knuckle Bear (1)
- 19" Zlik (1)
- 6" Skumbo (1)
- 7" Smash (1)
- 8" Moody (10)
- All City Style Subway Car (1)
- Buzz Carney (3)
- Circus Punks (3)
- Dalek (1)
- Doze Green Travela (1)
- Dr. Bomb (2)
- Floaty Bear (1)
- Fourcube (1)
- Grabbit (1)
- Hellhound (1)
- JAMUNGO 9" B.U.D. (7)
- JAMUNGO 9" NADE (7)
- JAMUNGO SQWERT (1)
- Kidrobot 10" Labbits (2)
- Kidrobot 5" Labbits (3)
- Kidrobot 6" Teeter (1)
- Kidrobot 7" Munny (4)
- Kidrobot 8" Dunny (23)
- Kidrobot 8" Munny (109)
- Kidrobot Mega Munny (4)
- Kidrobot Munny Mobile (1)
- Large Rubby Ducky (1)
- Lunartik in a cup of tea (1)
- Mad*L (14)
- Mega Meatwad (1)
- MegaGwin 13" (1)
- NedZed (1)
- NedZed (1)
- Ningyo Gosho (1)
- Pink Veil by Jermaine Rogers (1)
- Plaseebo (1)
- Rolito (1)
- Sam Flores' Fatima (1)
- SwearBear (1)
- Toy2r 16" Qee (3)
- Toy2r 8" Qcat (1)
- Toy2r 8" Qee (40)
- Toy2r Rolitoboy (1)
- UNKL SUG (1)
- Mini Vinyl Toys (135)
- 3" Baby Di Di & Mei Mei (1)
- 3" Mad*L (3)
- 3" Trexi (2)
- 3" Whalenas (1)
- 3.5" Teddy Troop (1)
- 4" Icebot (1)
- Artoyz Chaos Monkey (1)
- Bagman (1)
- Broken Heart Robot (1)
- Get Small Jeremy Fish (1)
- Kaniza – StarFish (1)
- Kidrobot 2" Labbits (4)
- Kidrobot 3" Dunny (40)
- Kidrobot 3" Fatcap (1)
- Kidrobot 4" Bub (1)
- Kidrobot 4" Mini Munny (57)
- Munnyworld 4" Mini Trikky (1)
- Scarygirl City Folk (1)
- Snorse by Pete Fowler (1)
- Tamo (6)
- Toby HK (1)
- Toy2r Baby Qee (3)
- U.B.Funkey (1)
- Vimobot (4)
- Shop (2)
- Site News/Annoucements (4)
- Various Toys (34)
- Cars (3)
- Paper Toys (13)
- Plaster Toys (3)
- Wood Toys (4)
- Videos (1)
Archives
- March 2016
- December 2014
- August 2012
- July 2012
- April 2012
- September 2010
- August 2010
- July 2010
- June 2010
- May 2010
- April 2010
- March 2010
- February 2010
- January 2010
- December 2009
- October 2009
- September 2009
- August 2009
- July 2009
- June 2009
- May 2009
- April 2009
- March 2009
- February 2009
- January 2009
- December 2008
- November 2008
- October 2008
- September 2008
- August 2008
- July 2008
- June 2008
- May 2008
- April 2008
- March 2008
- February 2008
- January 2008
- December 2007
- November 2007
- October 2007
- September 2007
- August 2007
- June 2007
- May 2007
- April 2007
- March 2007
- February 2007
Meta
Art
Designer Vinyl Toys
- Crazy Toyz
- Custom Toy World
- Dunny Club
- Kitoy
- Mine Has Blue Wings
- Miscreation Toys
- Omni Monster
- Plastic And Plush
- Toy Break
- Toysrevil
- Vince Toys Studio
- Vinyl Abuse
- Vinyl Addiction
- Vinyl Pulse
- Vinyl Toys Forum
- Wondertoyz